A Web Developer's Guide to Making Your First Personal Website and Blog
October 22, 2021
In my previous post I shared how a shift in mentality gave me the push I needed to launch my blog in ‘early access’ mode, an MVP that I can build up gradually and share the process with my readers. In this article I want to share a practical step-by-step guide on taking that same leap yourself.
Why you should start writing online
As a fellow software engineer, you’re probably already sold on the idea that having a personal website is a great investment for your career. Unlike a social media account, you have full control over both the platform and the content. Any prospective client or employer will google your name and if your website is a top search result it gives you an opportunity for a genuine first impression, not one that is curated by some company’s discovery algorithm or advertising interests.
Making a habit of writing about your professional niche on your own blog helps you become a better writer and a better communicator. The ability to document the things you learn and to explain how a block of code works are highly sought-after skills in the tech world. There are few things more frustrating than working with a framework or tool that doesn’t have well written documentation or clear examples.
Writing about your work is an excellent way to have a wider impact in your profession. Even if you’re not the most authoritative figure on a subject, when you share the challenges you’ve faced and the things you’ve learned, it’s from your unique point of view. And that’s very relatable and valuable to someone who is new to a problem that you’ve only recently solved.
When you start building up a significant body of written work, you’ll find yourself exposed to interesting opportunities for consulting and speaking engagements. It leads to professional connections and invaluable networking opportunities.
Alternatives to coding the website yourself
Website builders like Squarespace, Wix, Ghost and Wordpress are great tools for most developers looking to start a personal website. They’re very quick to set up, start off at affordable prices, and allow you to focus on writing rather than worrying about design, accessibility, infrastructure, maintenance and security. All of the previously mentioned options allow you to own your content and publish on your own domain.
In addition, you can also consider an online publishing platform (Hashnode, Medium, Dev.To etc). Some allow you to publish using your own domain and all have the advantage of built-in discoverability, since they’re platforms used by like-minded developers to share and learn. In fact, a great strategy is to cross-publish to these online publications to increase your reach. And if you research web content syndication and understand cannonical links, you’ll make sure that your own website’s search rankings aren’t affected by duplicate content accross the web.
Coding your own website
If you’re just starting out with learning web development, if you have limited time that you can spend tinkering with your website or if you’re in an ancillary role such as developer advocacy or management, then going with an online publication or a website builder is probably a better option than coding your own. Most of your readers are going to care about the content and quality of your writing rather than your technology stack.
Choosing an off-the-shelf website builder as a web developer can feel a bit awkward, but it’s important to prioritize putting your writing out there. And if you lack the time or technical ability, than starting out with an off-the-shelf solution is better than having no web presence at all.
With those disclaimers out of the way, I do think that coding your own website can be really rewarding and fulfilling. It allows for endless customization options, the choice for any technology stack, and the opportunity to experiment with new tools on a real world project.
And if you do decide to code your own, my advice is to ship your website as quick as possible, starting with a small MVP and building it up in public, while sharing that process with your readers.
Tools and technology stacks
When it comes to coding your own website, there are so many tools available to streamline that process. You could opt to use plain HTML, CSS and JS, and that’s a fantastic choice for someone who hasn’t yet dabbled in JS frameworks like React, Vue or Angular. As your project grows in time you may run into problems maintaining and scaling your website - the very problems those frameworks were made to solve. But focusing on the fundamentals is a great way to get practice and start building a writing habit.
If you’re familiar with a framework, I recommend that you research and pick a static site generator that’s built on it.
In this guide I’m going to show you how to bootstrap a project using GatsbyJS, which is built on React. As a React developer, I think you’d be hard pressed to find a better tool for building a personal website. It’s even mentioned in React’s official documentation as their recommended solution for building static content-oriented websites.
How to code and deploy your own website using Gatsby V4 & Netlify
The following guide should take around an hour to complete and is written for web developers who have at least some basic knowledge of command-line, version control and a modern Javascript framework, preferably React. You don’t need to have advanced experience with any of the these, but if you’re very new to web development (hello, welcome, it’s so nice to have you here!) I would recommend that you skip this guide and set up your site using a developer-friendly publication (I personally endorse Hashnode, since they allow you to publish on your own domain, but Dev.to and Medium are also very popular with developers).
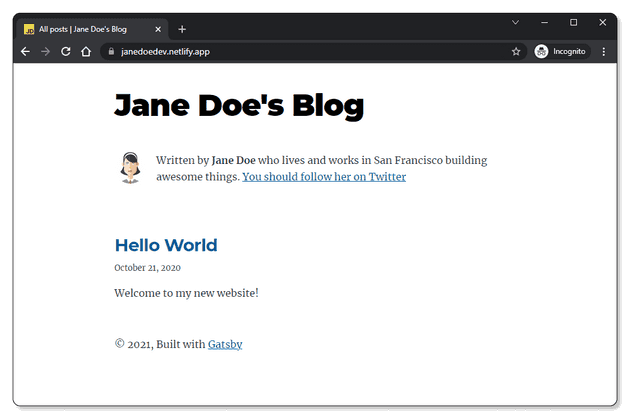
Before you get started, it’s good to have a look at what you’re going to be building towards. You’re going to be working from the Gatsby official starter template to create a simple page with a list of blog posts and personal bio. It’s a great little MVP to add to over time, and today you can customize all your personal details and even write your first post.
Ready? Let’s begin
Go through the following checklist and make sure you have:
- NodeJS installed on your computer (v14.15 or newer)
- A modern code editor (I love VS Code)
- Your preferred flavour of version control and an account with a repo hosting service (I’ll be using git and GitHub)
- An account with a website hosting service capable of deploying a Gatsby project (I use Netlify, but other popular options are Gatsby Cloud, Vercel, GitHub Pages etc.)
- An hour of uninterrupted time
- A soothing cup of your favourite hot beverage (I’m going to have an Earl Grey)
To create a Gatsby project, you’ll need to install the Gatsby CLI. Open up the command line (I use the integrated terminal inside VS Code) and run the following command:
npm install -g gatsby-cli
This will also update you to the latest version if you have an older one installed. To make sure you’re on version 4 or newer, type the following:
gatsby --version
Next, use the command line to navigate into the folder where you want to create your new project. I’ll be using a folder called Tutorial which is located on my Desktop:
cd Desktop/Tutorial
As mentioned, you’re going to be working from the official starter template provided by the Gatsby team, which already has the boilerplate and configuration to create a basic blog. Run the command gatsby new followed by the name of the folder where you want the site to be created followed by the name of the repo where the starter files are hosted. I’ll choose to name my folder my-tutorial-site.
gatsby new my-tutorial-site https://github.com/gatsbyjs/gatsby-starter-blog
Depending on your internet speed, it may take up to a few minutes for the project to be downloaded and set up. You’ll know that Gatsby has finished doing it’s magic when you see the success messages in your terminal:
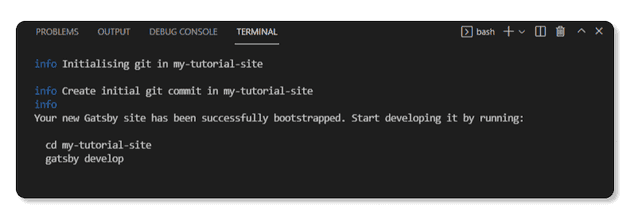
Navigate into your newly created folder.
cd my-tutorial-site
Now start a local development server by running the following command:
gatsby develop
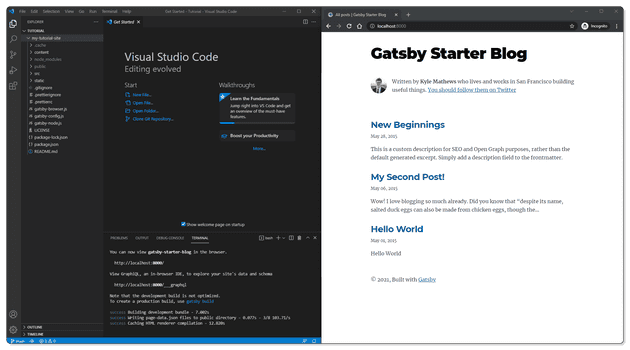
Wait for Gatsby to finish making your dev build and start up your development server. You’ll know that’s done when you see the following output in the console:
You can now view gatsby-starter-blog in the browser.⠀http://localhost:8000/⠀View GraphiQL, an in-browser IDE, to explore your site's data andschema⠀http://localhost:8000/___graphql
Open a new browser tab and navigate to https://localhost:8000.
And there’s your website! You should be able to see changes you make and save in your codebase in real time on your website as long as your development server is running. To quit, type CTR+C in your terminal. Remember that you can start your development server again at any time using the gatsby develop command.
Before you start making modifications to the template you should back up this project with version control. You’ll need that set up to deploy it to a hosting service anyway, so you might as well do it now.
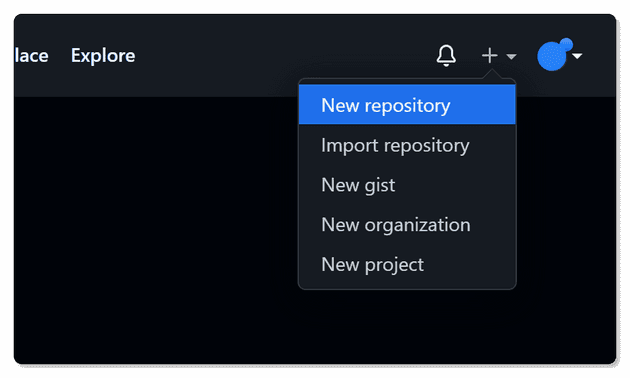
Create a new repository with your repo hosting service. If you’re using GitHub, click the plus icon on the top navigation bar and select “New repository” from the dropdown.
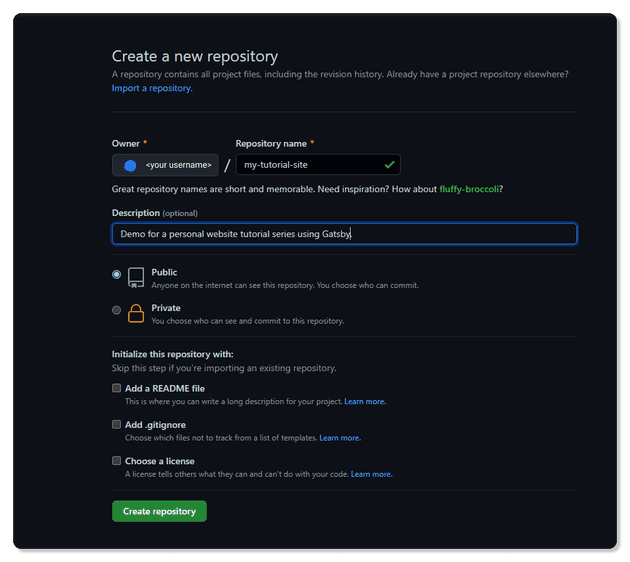
On the new repo creation form I like to match the repository name to the name of the project folder on my local drive. You can choose to make the repo private or public, that’s up to your personal choice, and it won’t affect your ability to follow along with the rest of this guide. I prefer to keep my personal website closed-source, but I’ll leave this example project open-source so that anyone can have a look at the code. Leave the rest of the options unchecked and press the ‘Create repository’ button.
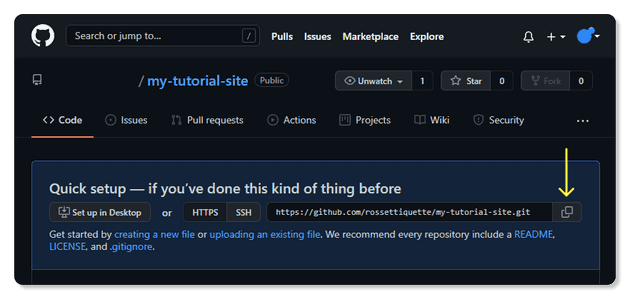
Next, copy the remote URL from the top of the Quick Setup page.
You’re going to return to you terminal to push your local code to the newly created GitHub repository. Stop your development server by using CTR+C in the terminal, then type the following commands (and make sure you insert the URL you just copied instead of <YOUR_REPO_URL> ):
git remote add origin <YOUR_REPO_URL>git push -u origin main
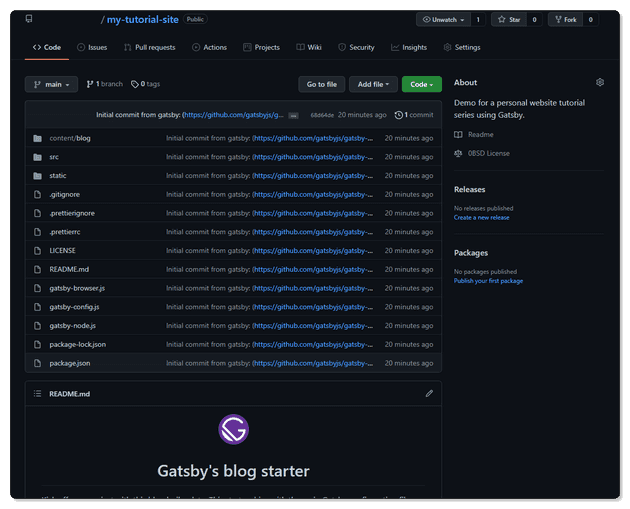
Refresh your GitHub repo page and check to make sure your files have been uploaded. It should look something like this:
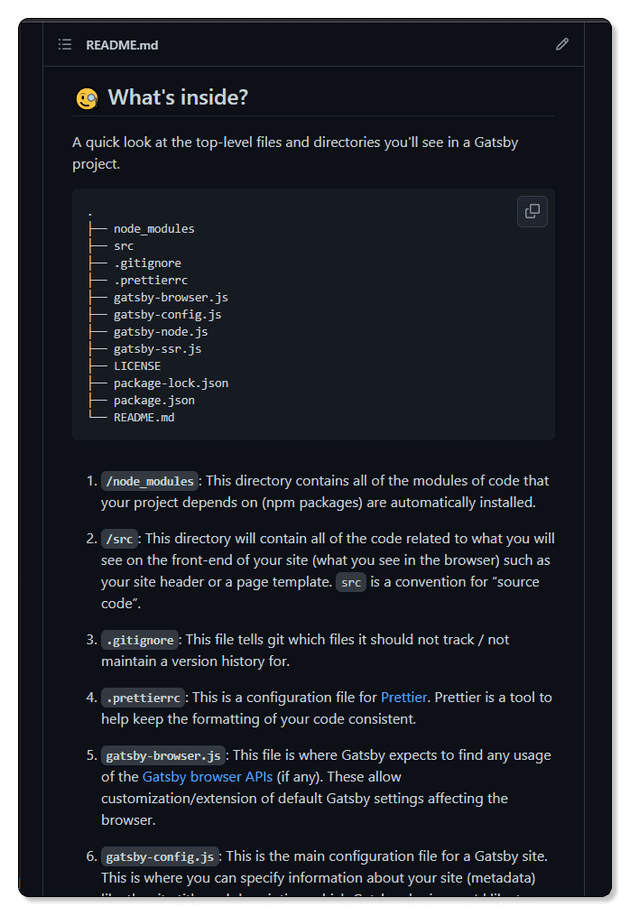
While you’re still on the repo page, take a moment to look at the readme info to familiarize yourself with the file structure and make sure you understand roughly how the project is laid out.
Next comes the fun part: you’re going to start customizing the template to make your own unique website.
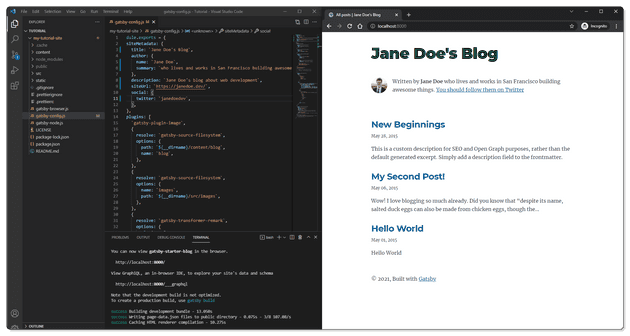
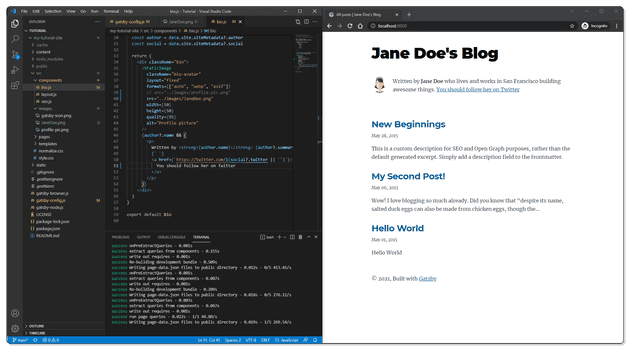
Open the gatsby-config.js file that’s located in the root of your project folder. Edit the siteMetadata object to replace the starter data with your own. Here’s my progress:
siteMetadata: {title: `Jane Doe's Blog`,author: {name: `Jane Doe`,summary: `who lives and works in London building awesome things.`,},description: `Jane Doe's blog about web development.`,siteUrl: `https://janedoe.dev/`,social: {twitter: `janedoedev`,},},
Fill out the summary with your own mini-bio information. Then, if you get stuck filling the siteUrl because you don’t have a domain name yet, this is a great time to take a break and go purchase one from any reputable registrar. I use Google domains, but you can shop around to get the best offer. If your own name isn’t available with the .com extension, try looking for a popular alternative like .dev, .io, .tech or .me.
Save your progress and check to see the changes reflected on the website. Whenever changes are made to the gastby-config file, the development server needs to be restarted (in your terminal use CTR+C to stop the process, then type gatsby develop to start it up again). Your page should now look different from the starter:
Now it’s time to swap out the image assets for your own. I created an avatar using Hexatar, but if you already have a profile picture you can place a copy of it in the src/images folder. Open the bio.js file (it’s located in the src/components folder) which exports the React component that renders the profile image. Find the <StaticImage /> component and change the src prop to match your own image path. Save your work and check out the progress:
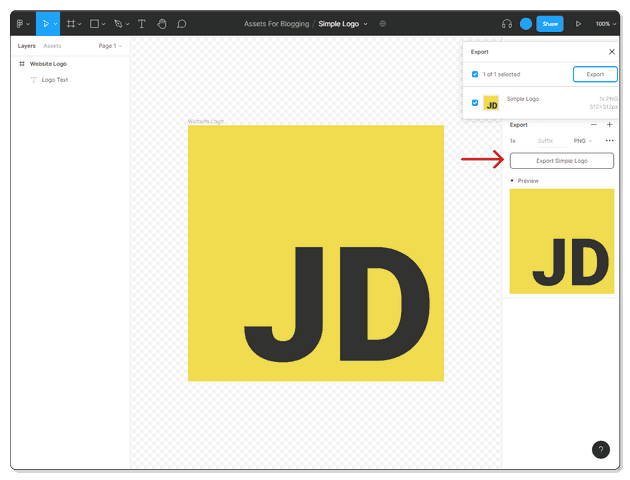
You also need to replace the Gatsby logo with your own favicon. The image that’s included in the starter is a 512x512px png file, so I recommend you stick with this. If you don’t have a personal ‘brand’ logo that you usually use, I recommend going with your initials over a solid background. I’ve taken inspiration from the javascript logo and created this template in Figma for you to customize and download (you may need an account with Figma to access the file). There’s also a version on Canva if you prefer it. Once you’re done editing the file, click the export button in the right pane (make sure nothing is selected in order to get the correct context menu).
Place a copy of your logo file into the src/images folder, then reopen the gatsby-config.js file and search for the website manifest information (use CTR+F in the IDE to search for the keyword ‘manifest’). Change the name and short_name to your own data and replace the gatsby icon image path with your own logo path. Save the file, restart your development server and refresh your browser window.
You can now delete the original profile-pic.png and gatsby-icon.png from src/images folder that are no longer needed.
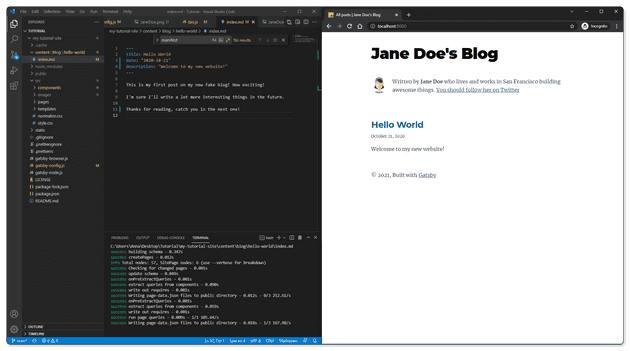
The next step is tackling the blog posts, located in content/blog. To automate a lot of the heavy lifting, Gatsby programmatically creates HTML from files that are written in markdown (text files with the .md extension). If you haven’t written in markdown before, check out this guide. It’s a friendlier alternative to HTML that supports links, images, and basic text styling like headings, bold, italic, bullet points, etc. Every folder inside content/blog contains a markdown file named index.md. Go ahead and open up the markdown file inside the hello-world folder. The first part of the file contains frontmatter, which is metadata that can be used by Gatsby in a few different ways. In this example, the dates are used to sort the posts chronologically on the front page. The details about how Gatsby uses frontmatter are beyond the scope of this guide, but you can read more about it, including how to add your own fields, in the official documentation.
For now, leave the title and description unchanged, but update the date to the current day. Next, delete the rest of the post and try your hand at writing your first article. Make it short and sweet. It doesn’t need to be your best writing. If you’re lacking inspiration, try jotting down some notes about the reasons why you chose to code your own website over going with a website builder or publishing platform, the struggles you’ve faced up to this point and what you hope the blog will blossom into. When you’re done, save your work and delete the other two blog post folders.
When you go back to write your next posts, keep in mind that Gatsby uses the folder names to create the slugs (in my example, a folder named ’my-second-entry’ will create a page available at janedoe.com/my-second-entry), while the title displayed on the pages comes from the frontmatter.
Save your work and double check that all links work, that your profile image displays correctly, that the favicon is picked up by the browser and that you’ve updated all the personal information with your own. When you’re satisfied that everything is as it should be, commit your changes with git.
git add.git commit -m "Changed personal info and added first blog post"git push
That’s it! All you need to do now is share it with the world. I’ve been using Netlify to host static websites, as they have a generous free tier and their terms of service allow commercial use on their unpaid package.
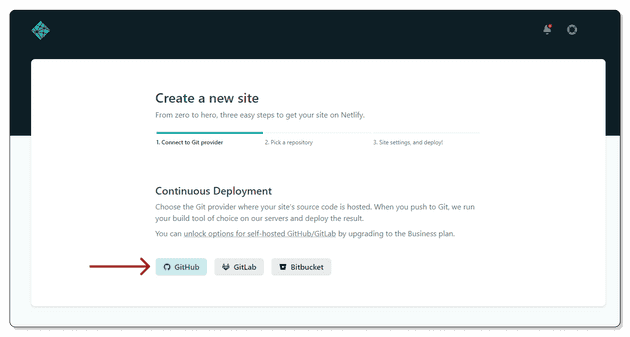
Log in to your Netlify account and click the New site from Git button on your dashboard.
On the next page select your git host and follow the directions to authorize Netlify to access your account.
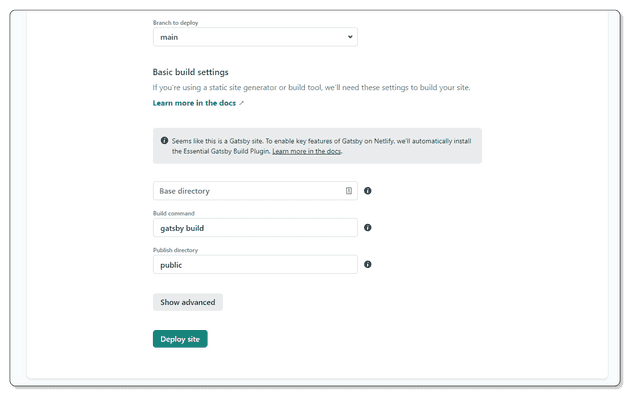
Next, select your project repository from the list of all repos hosted on your account. On the Settings Configuration page, set your deployment branch to main, the build command to gatsby build and the publish directory to public/. When you’re done, hit the ‘Deploy site’ button. It takes a few minutes for Netlify to build the site, so get up and have a stretch.
Every time you push a new change to your main branch, Netlify will automatically trigger a new build, so it’s worth getting used to experimenting with new features on different git branches rather than committing everything to main.
When you come back, you should have a live website! Netlify provisions a temporary site name, so go ahead and add your own domain. And that’s it! Your website is live, so go check it out and share it with the world:
That’s a wrap!
Congratulations!
Make a plan to regularly come back to your website to post new articles and continue to add features. If you’re new to Gatsby, start by reading their brilliant documentation. Try your hand at changing the styling, adding support for MDX and create a few more pages, like an about or contact page. Document your journey building up your website by writing articles for your blog.
I hope you found this guide useful, and if you followed all the way through, share your new website with me on twitter! I’d love to see it!
Cheers!
